
Publishing a blog post is just the beginning. What you do in the first 24-48 hours after hitting "publish" can make the difference between a post that gets buried in search results and one that drives consistent traffic for months. As a former computer science professor and current AI automation specialist, I've tested these strategies extensively and seen dramatic improvements in blog performance when implemented systematically.
Here's your complete step-by-step roadmap to maximize every blog post's reach and impact.
Step 1: Submit to Google Search Console
Time Required: 2-3 minutes
Impact: Critical for search visibility
Don't wait for Google to discover your content organically—this could take weeks or even months.
- Grab your blog post URL (the complete link to your new post)
- Navigate to Google Search Console
- At the top of the dashboard, locate the "Inspect any URL" search bar
- Paste your blog post URL and press Enter
- If the post shows as "URL is not on Google," click "Request Indexing"
- Wait for confirmation that your request has been submitted
Pro Tip: This simple action can reduce your indexing time from weeks to hours, giving you a significant head start on competitors who skip this step.
Step 2: Submit to Bing Webmaster Tools
Time Required: 2-3 minutes
Impact: Access to the second-largest search engine
While Google dominates search, Bing still commands a significant market share, especially in business and older demographics.
- Create an account at Bing Webmaster Tools
- Navigate to the URL Inspection section in your dashboard
- Enter your blog post URL in the inspection field
- Click "Inspect" and wait for the analysis
- If not indexed, click "Request Indexing"
Why This Matters: Bing users often have higher purchasing power and less competition for ranking, making this a valuable traffic source that most bloggers ignore.
Step 3: Implement Structured Data (Schema Markup)
Time Required: 10-15 minutes
Impact: Enhanced search listings and rich snippets
Structured data acts as a "translation layer" between your content and search engines, dramatically improving your chances of earning rich snippets.
- Open ChatGPT with GPT-4.1 in a new browser tab
- Paste your blog post URL and ask: "Please read this blog post and understand its content thoroughly"
- Once processed, request: "Create a comprehensive 5-question FAQ section based on this blog post's content"
- Review the generated FAQ and refine as needed
- Ask ChatGPT: "Generate the JSON-LD schema markup for this FAQ that I can add to my blog post header"
- Copy the generated JSON code
- Add the schema markup to your blog post's HTML header section
Advanced Insight: FAQ rich snippets can increase click-through rates by 35-40% according to recent studies, as they provide immediate value to searchers.
Step 4: Create Instagram Carousel Content
Time Required: 15-20 minutes
Impact: Visual social media engagement
Transform your blog content into engaging visual stories that drive traffic back to your site.
- In the same ChatGPT conversation, paste this prompt: "Convert this blog post into an engaging 5-slide Instagram carousel. Provide slide titles, descriptions, and visual concepts that tell a cohesive story."
- Review and refine the carousel concept
- Ask GPT-4.1: "Generate compelling images for each slide in a consistent visual style"
- Download all generated images
- Create your Instagram post with a clear call-to-action: "Want the complete guide? Link in bio 👆"
- Include your blog post URL in your bio link
Strategy Note: Carousel posts receive 1.4x more reach than single-image posts, making them ideal for content distribution.
Step 5: Design Pinterest-Optimized Graphics
Time Required: 10 minutes
Impact: Long-term traffic generation
Pinterest functions more like a search engine than a social network, providing evergreen traffic potential.
- In your ongoing ChatGPT conversation, request: "Transform this content into a Pinterest post concept"
- Specify: "Create a portrait-oriented image (2:3 ratio) optimized for Pinterest with compelling text overlay"
- Download the generated image
- Visit Pinterest and create a new Pin
- Upload your image and craft a keyword-rich title
- Add your blog post URL in the destination link field
- Write a description that includes relevant Pinterest keywords
Long-term Benefit: Pinterest pins can drive traffic for months or even years after creation, unlike other social platforms with shorter content lifespans.
Step 6: Craft Strategic LinkedIn Content
Time Required: 10-15 minutes
Impact: Professional network engagement
LinkedIn's algorithm favors content that keeps users on the platform, but strategic implementation can drive quality traffic.
- Ask ChatGPT: "Repurpose this blog post into a comprehensive LinkedIn post that provides 80% of the value but leaves readers wanting the complete guide"
- Maintain your original tone while adapting for LinkedIn's professional audience
- Include a subtle call-to-action directing readers to your blog for the "complete implementation guide"
- Add your blog post URL within the post text
- Use a compelling image (repurpose from Pinterest or create new)
Content Strategy: Focus on providing genuine value while creating a natural curiosity gap that encourages blog visits.
Step 7: Leverage Google My Business Posts
Time Required: 5 minutes
Impact: Local SEO and business visibility
Especially powerful for location-based businesses or services targeting specific geographic areas.
- Ask ChatGPT: "Convert this blog post into a Google My Business post, keeping it under 1,500 characters while highlighting the key benefits"
- Copy the generated content
- Access your Google My Business dashboard
- Click "Add Update" and paste your content
- Upload a relevant image (reuse from previous steps)
- Select "Learn More" as your button action
- Add your blog post URL as the destination
- Publish the update
Local SEO Benefit: Regular Google My Business updates signal active business management and can improve local search rankings.
Step 8: Generate AI-Powered Podcast Content
Time Required: 10 minutes
Impact: Multi-format content accessibility
Transform your written content into audio format using cutting-edge AI technology.
- Navigate to Google Notebook LM
- Create a new notebook project
- Click "Add Source" and select "Website"
- Paste your blog post URL and wait for processing
- Once processed, click "Generate Audio Overview"
- Download the generated WAV file (typically 10-20 minutes long)
Innovation Note: AI-generated podcasts can provide content in over 50 languages, dramatically expanding your potential audience reach.
Step 9: Embed Podcast on Your Blog
Time Required: 8 minutes
Impact: Increased time on page and accessibility
Audio content significantly increases user engagement and time spent on your page.
- Upload your podcast file to SoundCloud
- Add appropriate title and description matching your blog post theme
- Upload a cover image (reuse generated graphics from previous steps)
- Once published, click the "Share" button
- Copy the embed code
- Paste the HTML embed code into your blog post content
SEO Benefit: Increased time on page is a strong ranking signal, and audio content can improve this metric by 200-300%.
Step 10: Create Spotify Podcast Episode
Time Required: 10 minutes
Impact: Authority backlink and expanded reach
Podcast platforms provide valuable backlink opportunities while reaching audio-first audiences.
- Visit Spotify for Podcasters
- Create a free account if you don't have one
- Click "New Episode" and upload your WAV file
- Add episode title and description
- Include your blog post URL in the description with anchor text like "Read the complete guide here"
- Publish the episode
Authority Building: Even "no-follow" backlinks from major platforms like Spotify contribute to domain authority and search engine trust.
Step 11: Implement Strategic Internal Linking
Time Required: 10 minutes
Impact: SEO boost and user journey optimization
Leverage your existing high-performing content to boost your new post's visibility.
- Identify 2-3 high-traffic blog posts related to your new content
- Find natural linking opportunities within those posts
- Add contextual links to your new blog post using descriptive anchor text
- Update the older posts with these internal links
Link Equity Transfer: Internal links from high-authority pages can transfer ranking power to new content, accelerating the indexing and ranking process.
Step 12: Enhance with Video Content
Time Required: 5 minutes (if video exists)
Impact: Multimedia engagement and extended session duration
Video content significantly increases user engagement and provides additional ranking opportunities.
- Identify a relevant YouTube video (preferably your own content)
- Embed the video within your blog post using YouTube's embed code
- If it's your video, add your blog post URL to the video description
- Position the video strategically to support your written content
Engagement Boost: Blog posts with embedded videos receive 300% more inbound links than text-only posts.
Step 13: Add Custom Illustrations
Time Required: 10-15 minutes
Impact: Visual engagement and unique content
Custom illustrations make your content more shareable and memorable.
- Visit Napkin.ai
- Create a new blank project
- Select key sections of your blog post content
- Paste the text into Napkin.ai
- Generate supporting illustrations using their AI tools
- Download as PNG and convert to WebP format for faster loading
- Insert illustrations throughout your blog post
Visual Impact: Custom illustrations can increase content sharing by up to 650% compared to stock photos.
Step 14: Create Interactive HTML Elements
Time Required: 15-20 minutes
Impact: Enhanced user engagement and unique value
Interactive elements set your content apart from standard blog posts.
- Open Gemini and ensure 2.5 Pro with Canvas is selected
- Copy your blog post content and paste into Gemini
- Request: "Analyze this blog post and suggest 3 interactive HTML elements that would enhance user engagement. Create them using only HTML, CSS, and vanilla JavaScript—no external libraries."
- Select your preferred concept and ask Gemini to generate the code
- Test the interactive element using the Canvas preview
- Copy the HTML code and embed it in your blog post
Engagement Metrics: Interactive content generates 2x more engagement than static content and significantly increases time on page.
Step 15: Monitor and Optimize Performance
Time Required: 10 minutes initially, then ongoing
Impact: Continuous improvement and data-driven decisions
Set up tracking to measure the success of your promotional efforts.
- Monitor Google Search Console for indexing status and search performance
- Track social media engagement across all platforms
- Analyze blog traffic using Google Analytics
- Document which strategies drive the most traffic for future reference
- Refine your approach based on performance data
Bonus Step 16: Create TikTok Micro-Learning Content
Time Required: 15 minutes
Impact: Tap into short-form video audiences
Transform your blog insights into bite-sized, engaging video content.
- Return to your ChatGPT conversation and request: "Create a series of 5 TikTok video concepts based on this blog post. Each should be 30-60 seconds and focus on one key takeaway with a hook, value delivery, and call-to-action."
- Select the most engaging concept
- Ask GPT-4.1: "Generate a detailed script for this TikTok video including visual cues, text overlays, and trending hashtag suggestions"
- Create the video content using your smartphone or video editing tools
- Include your blog URL in your TikTok bio and mention it in the video
- Use trending hashtags related to your niche
Viral Potential: TikTok's algorithm can rapidly amplify content, potentially driving massive traffic spikes to your blog.
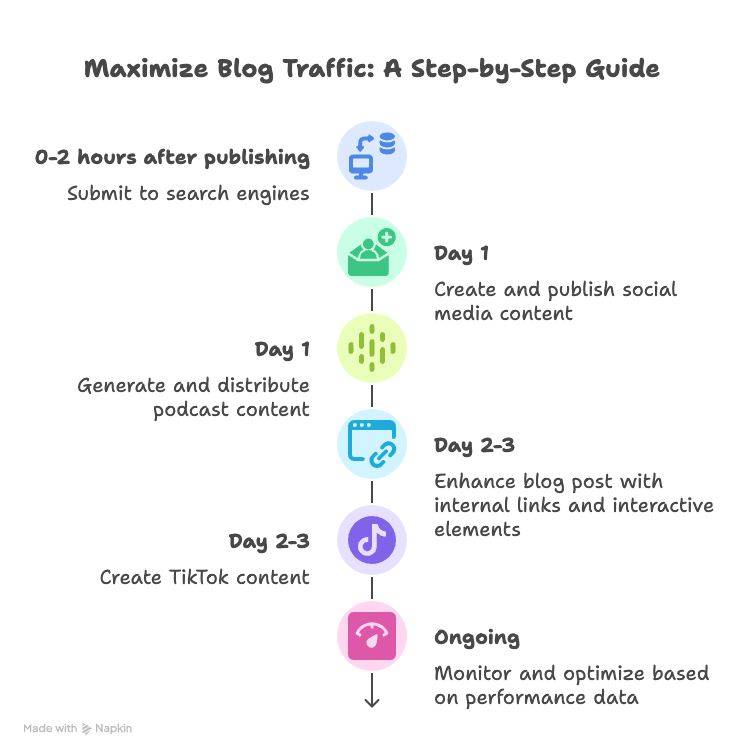
Implementation Timeline
Immediate (0-2 hours after publishing):
- Steps 1-2: Submit to search engines
- Step 3: Add structured data
Day 1:
- Steps 4-7: Create and publish social media content
- Steps 8-10: Generate and distribute podcast content
Day 2-3:
- Steps 11-14: Enhance blog post with internal links and interactive elements
- Step 16: Create TikTok content
Ongoing:
- Step 15: Monitor and optimize based on performance data
The Compound Effect
When implemented systematically, these strategies create a compound effect. Each promotional channel reinforces the others, creating multiple pathways for discovery and engagement. The key is consistency—implementing this process for every blog post you publish.
Remember, content promotion is not a one-time activity. The most successful bloggers treat promotion as an ongoing process that continues weeks or even months after initial publication.
What's your biggest challenge with blog promotion? Let me know in the comments, and I'll share specific strategies to overcome it.
Ready to automate your content promotion process? Learn advanced AI automation strategies at AI Automation Elite - our comprehensive training platform that teaches businesses and entrepreneurs how to implement AI-powered content strategies that drive consistent traffic and engagement. Master the automation workflows that transform your digital marketing results.


